Thursday, February 28, 2013

Make a Boho Braided Side Bun For Hair

Make a Boho Braided Side Bun For Hair
How to Style :
  • Step 1 : Part your hair asymmetrically, and begin French braiding from the temple of the side of your head with less hair to directly beneath your ear on the opposite side.
  • Step 2 : Continue braiding down like normal for an inch or two, and then tie off the end with a clear elastic hair tie.
  • Step 3 : Using a curling iron, wrap the rest of your hair away from your face to create loose, summery beach waves.
  • Step 4 : To balance out your French braid, grab a few random pieces from the opposite side of your head and do a loose twist.
  • Step 5 : Join the French braid and twist together to fashion a very organic, boho chic side bun.
  • Step 6 : Secure your bun with several bobby pins, and to add a bit of texture, spray your updo with Hairspray. et Voila!
Source : A Boho Braided Side Bun 


Tutorials You Should also see :
3 Steps To Easy Breezy Beach Waves
how to make hair chalking on dark hair
beautiful Side braid
How to make Double Side Braid For Hair
Make a beautiful braid for your hair

Wednesday, February 27, 2013

3 Steps To Easy Breezy Beach Waves

3 Steps To Easy Breezy Beach Waves
How To Style : 
Step 1 : Start with wet hair and a great product to help work some wave into your mane.
 =====> Paul Mitchell's Ultimate Wave Beachy Texture Creame-Gel really does the trick for my hair. I also use their Twirl Around Crunch Free Curl Definer when I need some extra curl.
Step 2 : Next just scrunch your hair a few times. Not rocket science, I know.
Step 3 : A little blow drying with a diffuser makes it extra luscious. Tousle your waves and that's really all there's to it.
Source : indian summer


Tutorials You Should also see :

  • how to make hair chalking on dark hair
  • beautiful Side braid
  • How to make Double Side Braid For Hair
  • Make a beautiful braid for your hair
  • Make a Medieval Braid For Your Hair

  • Tuesday, February 26, 2013

    How to create an up do with extensions

    Long hair extensions like twists or braids are great for creating stylish up dos. Up dos can be worn in a professional setting or for a causal look. View the pictorial below to learn how to create a professional up do with extensions.

    Pictorial courtesy of revele-toi.com

    how to make hair chalking on dark hair

    how to make hair chalking on dark hair
    How To :
    1. - Start with clean hair and section off the bottom half, securing the top half with a clip.
    2. - Take a small section of your hair and twist the hair. Mist the section with a water bottle.
    3. - Take your soft chalk pastel stick and rub over the section while twisting the strand back and forth. Repeat over as many sections as desired.
    4. - To get the color to stick around, run a flat iron or curling iron through your hair, then spraying with a light hair spray.
    5. - Be creative after chalking your hair! Style in a messy bun or braids to show off the vibrant colors! 
    Source : How To... Master Hair Chalking

    Tutorials You Should also see :

    Sunday, February 24, 2013

    How to create a professional bun

    Wearing a high bun is a great professional hairstyle that can be created with yarn braids, yarn twists, and kinky twists. View the pictorial below to learn how to style your hair in a professional bun.

    Pictorial courtesy of revele-toi.com


    how to create yarn extensions: pictorial

    how to create yarn twists: video tutorial

    how to create yarn braids: video tutorial

    beautiful Side braid

    beautiful Side braid
    beautiful Side braid

    Tutorials You Should also see :

    Saturday, February 23, 2013

    How to make Double Side Braid For Hair

    How to make Double Side Braid For Hair
    Steps :
    1. Begin with your hair down.
    2. Take a section of your hair from the thicker side of your part.
    3. Then braid it all the way down. It will lie flat on your head best if you angle it back as you're braiding it.
    4. Next, using a technique Elsie and Sarah taught me here, slightly tug all along the braid, making it appear thicker.
    5. Once the braid is complete, pin it on the back/far side of your head underneath the top layer of your hair, covering the bobby pins.
    6. Next, braid the rest of your hair into a side braid.
    7. Continue with the same process as the first braid, slightly tugging along the whole thing.
    8. If it

    Tutorials You Should also see :

    Friday, February 22, 2013

    "5 DAYS OF HAIR BOWS"

    This week, it was all about "HAIR BOWS". And we both had a lot of fun doing it. We got lots of nice compliments too.


    We started doing the Hair Bow Braid hairstyle last Tuesday and since we got some nice compliments from that hairstyle, we decided to do the "5-Days of Hair Bows".


    DAY 1: "HAIR BOW BRAIDS"


    Last Tuesday i did this hairstyle to my daughter after I saw these neat trick Girly Do Hairstyles shared on how to achieve the bows much easier. You can check that video by clicking this LINK. Here are some more of the pics up close:


    DAY 2: "PIGTAILS WITH HAIR BOW ACCENTS"


    After getting nice compliments from Day 1's hairstyle, we did another hair bow hairstyle. This one is much easier to do. All you have to do is make a very low pig tails. Grab a small section from the top of the pigtail, and create your bow using an elastic band. You can check out Cute Girls Hairstyles for the video on making this bow. Their version is doing this bow in a low side ponytail. Here are some more pics of this hairstyle up close:


    DAY 3: "DRAGONFLY BOW BRAIDS"


    This hairstyle clearly speaks for itself! It does look like a "dragonfly"!! I created this one by accident. We ran out of time last Thursday on finishing a 2 sided Hair Bow Braids. I only finished one side with only 2 bows. Then i just gathered all the remaining hair into a side ponytail. As we were taking the pictures, we instantly thought that it looked like a dragonfly!! Here are some more of the pics:


    DAY 4: "UPSIDE DOWN DUTCH BRAIDS & A BOW"


    Inspired from the "Lady Gaga" hair bow. I started this hairstyle by making an upside down dutch braid. I braided my daughter's hair while sitting with her head faced down. I braided it only halfway through. Then tied the rest of the hair into a high ponytail. From there you can create the "Lady Gaga hair bow". More pics here:


    DAY 5: "RIBBON BOW HALF PONY"


    This one is so pretty and very girly. It is like a pretty ribbon/bow on top of a cute gift. Just section your hair from ear to ear and tie them into a half pony tail. From there you can now make your ribbon bow. Or you can check out BEBEXO's Video Tutorial on this ribbon bow. By the way i didn't used any hair spray on my daughter's hair. It's all bobby pins and i did this while her hair is a bit damp. Plus, the tails of this ribbon bow i just curled using my forefingers. 


    And that's it!! Our "5-DAYS OF HAIR BOWS" hair challenge! Wow! I feel so good after accomplishing this challenge i did for myself. I hope you guys like what i did here. You can check these pics also on our following accounts (and please, do follow & like us there too):
    FB Page - PRETTY HAIRSTYLES FOR GIRLS
    Instagram - @SamsPrettyHair;
    Twitter - @SamsPrettyHair;
    Pinterest - **Sam's Pretty Hairstyles**
    Muzy - Sam's Pretty Hairstyles Muzy

    Remember guys, "If I can do these hairstyles, so can you!"
    Just put your heart, passion & interest on it and in a few tries you will be able to do them, too. And this is one good way to bond with your pretty daughter/s too!

    Happy Hair Styling everyone!

    Lots of Love,

    Make a beautiful braid for your hair

    Make a beautiful braid for your hair
    Make a beautiful braid for your hair


    Tutorials You Should also see :

    Thursday, February 21, 2013

    Make a Medieval Braid For Your Hair

    Make a Medieval Braid For Your Hair
    Make a Medieval Braid For Your Hair

     Source : MEDIEVAL BRAID

    Tutorials You Should also see :

    Wednesday, February 20, 2013

    Make a Ringlet Headband

    Make a Ringlet Headband
    Source : Make a Ringlet Headband


    Tutorials You Should also see :

    Tuesday, February 19, 2013

    12 Beautiful Chignon Hairstyles

    12 Beautiful Chignon Hairstyles for wedding


    Tutorials You Should also see :

    Monday, February 18, 2013

    "Our Fave Hairstyles Learned From CUTE GIRLS HAIRSTYLES"!!

     I have been an avid fan/follower of moms who have a great talent in HAIR STYLING. I followed their blogs, YouTube videos, Twitter, Pinterest & FB Page. Most of you probably have read my other post featuring Hairstyles For Girls - Princess Hairstyles, you can read it HERE. Well, I have another mom hair blogger i would like to share with you whom I have learned a lot of hairstyles too. This is Mindy McKnight's blog CUTE GIRLS HAIRSTYLES!


    visit Mindy's blog here: www.cutegirlshairstyles.com

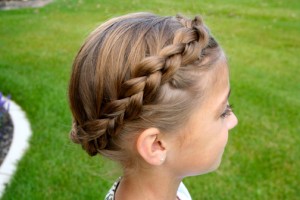
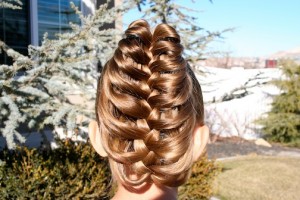
    This was the 2nd hair blog/tutorial I saw online and Mindy (the blog owner) makes very nice, pretty, fun, creative & unique hairstyles for girls. I think the very first hairstyle i learned from her was the BRAIDED CROWN:


    here is the pic from Mindy's blog featuring the "braided crown" hairstyle

    www.samsprettyhairstyles.blogspot.com
    this is my version of their "braided crown"

    www.samsprettyhairstyles.blogspot.com
    here's another view of our "braided crown"

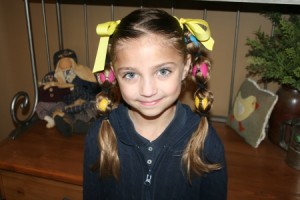
    Most of the other hairstyles I've seen from this blog are fun, unique, and easy to learn. Another hairstyle that caught my eye was her hair style for Easter, the EGG TAILS - EASTER HAIRSTYLE!

    This is Mindy's version of the EGG TAILS:


    This is my version of their hairstyle:
    www.samsprettyhairstyles,blogspot.com

    www.samsprettyhairstyles,blogspot.com

    www.samsprettyhairstyles,blogspot.com
    *the only difference in my version is that
     i made 4 mini braids on each pony tail 
    to act as the cage for the eggs*

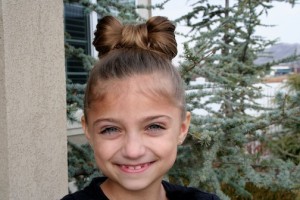
    One time, me & my daughter were feeling a bit LADY GAGA! We want a fun and unique hairstyle. And when i looked at Mindy's hair blog...BOOM! There it was, the ever famous LADY GAGA BOW!!

    This is Mindy's daughter wearing the Lady Gaga Bow hair style

    www.samsprettyhairstyles,blogspot.com
    Now this is my version of the Lady Gaga Bow....
    Another fun and funky style of hairstyle i found on Mindy's blog is the "BUN-HAWK" hair style which i think is perfect for something "funky" & fun, rock & roll kind of party.

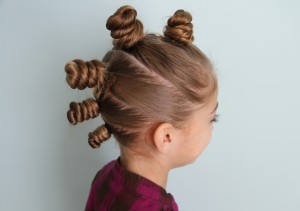
    the "bun-hawk" (like a mohawk)

    yeah!! look how happy she is!!
    rock & roll sistah!
    And here's our version of this crazy hairstyle, which by the way was worn with a cute Lady Gaga inspired top (just look at the big bow details on the shoulders):

    www.samsprettyhairstyles,blogspot.com
    i added some cute black & white butterfly earrings to go with this hairstyle

    www.samsprettyhairstyles,blogspot.com
    look at my daughter, ready to rock out!! ain't her black top cute?

    Another hairstyle I have learned was the CAGE BRAID PONYTAIL (RIB-CAGE BRAIDS). Here's the pic of what Mindy did:


    And this is my version of this hair style:

    www.samsprettyhairstyles,blogspot.com

    www.samsprettyhairstyles,blogspot.com

    These are just a few of the many hairstyles I have learned from Mindy and her blog CUTE GIRLS HAIRSTYLES. If you too want to learn from her, follow her blog. 

    You can check & follow her Instagram account:
    @CuteGirlHair

    Follow her too in Pinterest:
    Mindy "Cute Girls Hairstyles"

    You can also watch her YouTube video here: http://www.youtube.com/user/CuteGirlsHairstyles

    Follow her on Twitter too:
    https://twitter.com/CuteGirlHair

    You can look up these hairstyles too in her FB Page here:
    https://www.facebook.com/CuteGirlsHairstyles


    So what are you waiting for? Go there and learn some cute hairstyles for your daughters!!!

    As what Mindy would always say "HAPPY HAIRDOING!!!"

    Lots of Love,